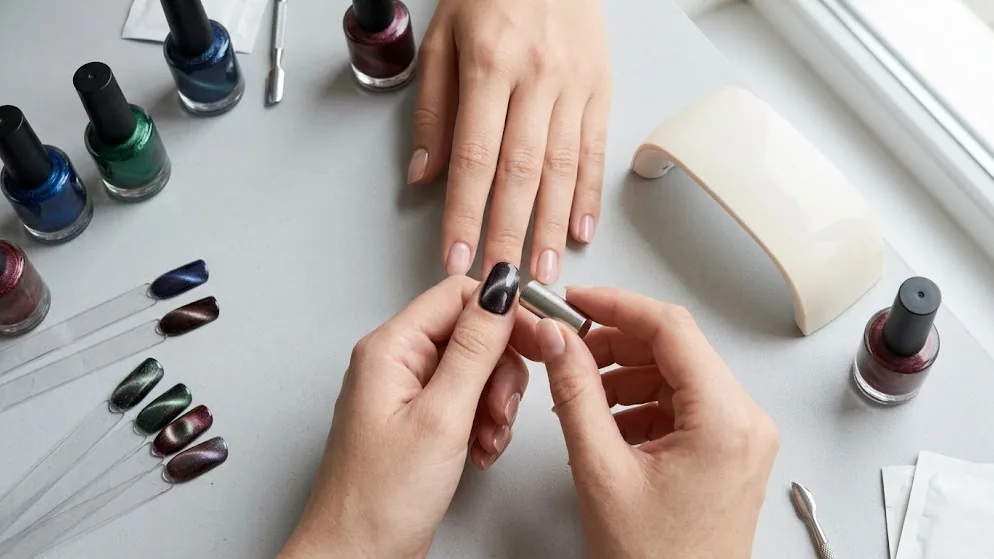
Cat eye nail polish gets its glowing three-dimensional stripe from iron powder suspended in the gel, which lines up under a magnet to form a band of light that shifts as your hand moves. The ingredient list of a market gel confirms it plainly: Absolute New York lists “Iron Powder” among the components of its Master Gel Mystic Aurora collection. That single detail is the whole trick.
Move a magnet close to the wet coat, the metallic particles cluster, and you get chatoyance, the same optical shimmer jewelers describe in tiger’s eye stone. Everything else in this guide, from magnet timing to the UV safety debate, builds on that one physical fact.
Before the walkthrough, a plain-language summary you can act on in one read.
Quick answer: Cat eye nail polish is a magnetic gel loaded with iron powder that must be cured under a UV or LED lamp, not air-dried like classic lacquer. You apply a thin coat, hold a magnet close for a few seconds so the particles align into a light band, then cure immediately before the pattern relaxes. A black base gives the sharpest contrast. The finish lasts like standard gel when you cap the free edge, and safe removal means an acetone soak-off, never peeling. Safety concerns center on UV lamp exposure and two ingredients, TPO and HEMA.
What the iron powder actually does under a magnet
The cat eye effect is not a pigment or a printed design. It is physics happening in real time inside a wet gel layer. Suspended iron powder particles are free to move while the coat is liquid, and a magnet held above them drags them into a dense line. Where the particles pile up, less light passes and the gel reads dark; on either side, light bounces off the aligned flecks and you get that bright ridge.
Tilt the nail and the ridge appears to travel, which is why the look mimics a cat’s slit pupil. The moment you cure the gel under a lamp, the particles freeze in place permanently. Nothing you do afterward, magnet or otherwise, will move them again.
- The band is a light illusion, not paint, so it changes with viewing angle.
- Particles only move while the gel is uncured and still fluid.
- A magnet pulls iron powder into a stripe, valley or swirl depending on its shape.
- Curing locks the pattern; after that, no magnet will change it.
This is also why timing matters so much. If you wait too long or let the coat start to skin over, the powder stops responding and the effect goes flat. Getting comfortable with your nail shape helps you place the band cleanly, and our guide to choosing and filing the right nail shape covers how the free edge and curve affect where the light lands.
It also helps to understand why a thin coat works better than a thick one. A thick layer of gel gives the iron powder more depth to travel through, which spreads the particles vertically as well as horizontally and blurs the resulting band. A thin, even coat keeps the powder closer to the surface, so the magnet’s pull produces a crisper, more concentrated line. This single detail, coat thickness, explains most of the difference between a sharp salon-quality result and a hazy amateur one.
Magnet distance and timing by brand, measured in millimeters and seconds
The single biggest variable in cat eye work is how close the magnet sits and how long you hold it, and brands publish different numbers because their gels and magnets differ. CANNI instructs holding the magnet close to the gel for a few seconds, then pulling it away fast before you cure. Vettsy calls for more clearance, holding it farther from the nail for a longer count.
Neither is wrong. A closer magnet produces a tighter, brighter line; more distance spreads the shimmer wider. Match the number to the brand you bought, then adjust by eye. If your first attempt looks too concentrated and narrow, back the magnet off a millimeter or two on the next nail. If it looks washed out and diffuse, bring the magnet closer and shorten the hold slightly.
Curing time depends on your lamp type. Bio Seaweed Gel lists a shorter cure time under an LED lamp than under a UV lamp for its base, a useful reference point because LED generally cures faster than older UV for the same product. If your set has been sitting tacky after the stated time, the lamp bulbs may be aging; most UV bulbs lose output after several months of regular use and should be replaced on a schedule rather than run until they visibly dim.
Here is a compact reference you can keep at your desk.
| Source | Magnet distance | Hold time | Then |
|---|---|---|---|
| CANNI | Close to the gel | A few seconds | Remove fast, cure |
| Vettsy | Farther above the nail | A somewhat longer hold | Remove, cure |
| Bio Seaweed Gel (cure) | n/a | Shorter under LED, longer under UV | Top coat next |
One rule sits above all the numbers: never let the magnet touch the wet gel, or you will smudge the surface and ruin the coat. Hover, count, lift, cure. If your hand is not steady enough to hold a fixed distance for the full count, rest your elbow on the table and support the magnet hand with your other hand rather than freehanding it in the air.
Building the layers, from degrease to top coat
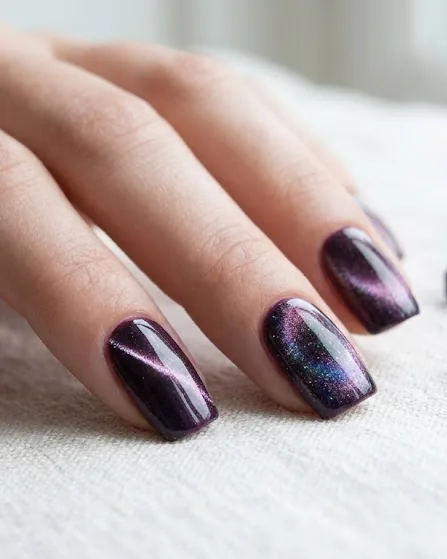
A cat eye manicure is a stack of cured layers, and skipping the prep is the fastest way to a lift within days. Start by cleaning and dehydrating the natural nail so nothing traps oil under the gel. Apply a base coat and cure it fully. Many artists then add an optional colored base, because a black under-layer creates the highest contrast and makes the shimmer band read brightest.
The cat eye gel itself goes on as a thin coat that you leave uncured, work the magnet over it, and then cure the instant the pattern looks right. Finish with a top coat and a final cure.
The order that consistently works:
- Prep and degrease the nail plate so it is matte and dry.
- Base coat, cured fully under your lamp.
- Optional black or dark base for maximum contrast, cured.
- Cat eye coat, thin and even, left uncured.
- Magnet held per your brand’s distance and time.
- Flash cure immediately to lock the band.
- Top coat, cured, then wipe the sticky layer if your product needs it.
Cap the free edge on every layer, meaning you brush the gel over the very tip of the nail. That thin seal is what stops chipping and gives the manicure gel-length wear rather than a two-day life. Skipping this step is the single most common reason a gel set lifts early, regardless of how good the cat eye effect looks.
A dehydrator or nail prep solution before the base coat also makes a measurable difference. Natural oils on the nail plate act as a barrier between the gel and the keratin surface, and even a thorough hand wash will not remove all of it. A quick wipe with isopropyl alcohol or a dedicated dehydrator right before the base coat gives the gel a cleaner surface to bond to, which shows up later as fewer lifted edges and longer wear overall.
Choosing a black base versus a clear or pale base
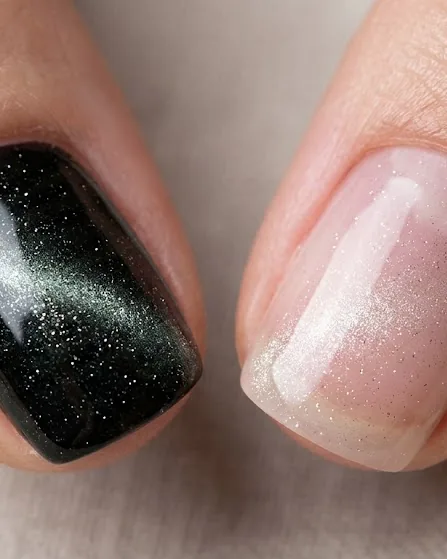
The base color underneath your cat eye layer changes the entire look, and it is worth understanding why before you commit a whole set to one choice. A black or very dark base absorbs the light that is not reflected by the aligned iron particles, so the shimmer band reads as a sharp, high-contrast stripe against a near-void background. This is the look most commonly seen in salon photos and social media posts, and it is the easiest for a beginner to judge, because the band either shows up clearly or it does not.
A clear or pale base produces a softer, more diffuse effect. Light passes through the surrounding gel instead of being absorbed, so the shimmer looks more like a glow than a hard line. Some nail artists prefer this for a subtle daily-wear look, or as a base for the overlay techniques described later in this guide, where a second sheer color is layered on top. Neither base is more correct than the other; the choice depends on whether you want a bold graphic stripe or a gentler wash of color-shifting light.
A neutral catalog of magnet techniques for different designs
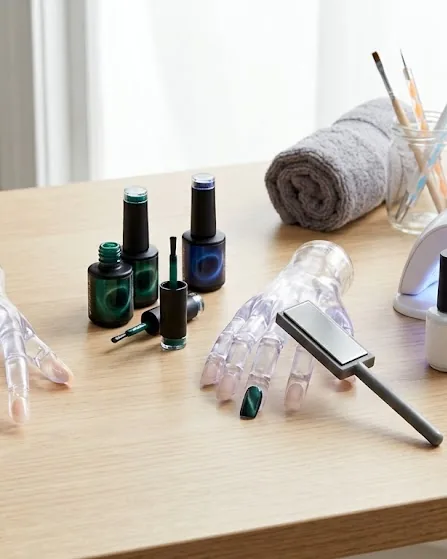
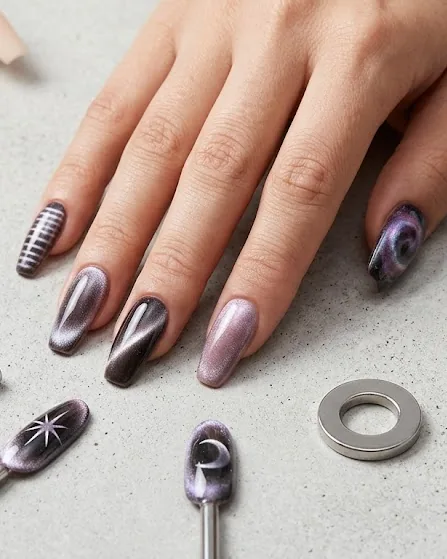
The magnet shape and the way you move it decide whether you get a plain stripe or a galaxy swirl, and none of this is locked to one brand. A straight bar magnet held flat gives the classic single band across the nail. Tilt the same bar and you get a diagonal line that looks longer on almost every nail shape.
A pointed or pen-style magnet draws a tighter, more focused streak, useful for flower centers and starbursts. Multi-head and dome magnets fan the particles outward for the wider “galaxy” or “aurora” spread. The technique is repeatable across gels because the iron powder behaves the same way regardless of the label.
Common looks and how the magnet creates them:
- Single band: flat bar magnet, held level, straight across.
- Diagonal: same bar angled corner to corner for a longer line.
- Double french: two passes near the tip and cuticle for twin bands.
- Flower: pointed magnet touched near a center point, petals radiating.
- Galaxy or aurora: dome or multi-head magnet swept for a soft spread.
- Glass and overlay: a sheer color coat over a cured cat eye layer for depth.
Overlay is where the effect turns into real nail art. Cure your first cat eye layer, then float a sheer tinted gel on top and pull a second, offset band. The two light lines stack and the nail gains visible depth. Sheer overlays are also how you shift a cold silver shimmer toward warm amber or violet without buying a new bottle.
For a double french design specifically, work one band near the cuticle line and a second near the free edge, leaving a gap of untouched gel between them. This creates the impression of two separate light sources on a single nail, an effect that photographs well and is popular for special-occasion sets. Practice the spacing on a nail wheel before attempting it on a live client or on your own dominant hand, and if you are unsure how band placement should shift for a rounder or more tapered tip, our nail shape guide is a useful companion reference for spacing decisions.
A stamping plate or hand-painted decal placed over a fully cured cat eye base is another way to add complexity without needing a second magnet pass. Because the shimmer layer is already locked in place, you can treat it exactly like a normal cured gel surface for any additional art, which is why nail-art focused guides tend to build advanced designs on top of a simple single-band cat eye rather than complicating the magnet step itself.
Is cat eye nail polish dangerous? What the UV and chemistry data show
The safety question that no product guide answers well comes down to two things: the lamp and the ingredients. Cat eye gel must be cured under a UV or LED lamp, and those lamps emit ultraviolet light, which is where the real scrutiny sits. A UC San Diego study published in Nature Communications found that a single 20-minute session under a UV nail dryer killed 20 to 30 percent of exposed cells, and three consecutive 20-minute sessions killed 65 to 70 percent, alongside DNA damage and mutations.
The lamps emit UVA in roughly the 340 to 395 nm band, a spectrum distinct from tanning beds at about 280 to 400 nm. That distinction matters because it means comparisons to tanning bed exposure are not one-to-one, even though both sources fall under the broad UVA category.
Regulators land in a more measured place. The U.S. Food and Drug Administration classifies nail curing lamps as low risk when used according to the label and advises not exceeding 10 minutes per hand per session. The American Academy of Dermatology recommends applying a broad-spectrum, water-resistant sunscreen of SPF 30 or higher to the hands before a gel manicure, or wearing opaque gloves, specifically because of the UV exposure.
Harvard Health Publishing has also reviewed the research on LED and UV nail lamps, referencing a 2014 JAMA Dermatology analysis, and generally frames the risk as low for occasional use but worth managing for anyone getting gel manicures frequently or working professionally around lamps all day.
Practical protection you can adopt today:
- Apply SPF 30 or higher broad-spectrum sunscreen to your hands, or wear UV-blocking gloves with the fingertips exposed.
- Do not exceed labeled cure times, and note the FDA’s 10-minutes-per-hand ceiling.
- Keep the room ventilated while you work.
- If you get manicures weekly or work as a nail technician, consider rotating sunscreen reapplication into your routine rather than treating it as a one-time step.
You can read the FDA’s own consumer guidance on how to safely use nail care products, and the AAD’s dermatologist tips for keeping nails healthy during gel manicures. The peer-reviewed UC San Diego work is published in full at Nature Communications. This is a sensitive health topic and the science is still developing; treat these as the current best evidence, not a final verdict.
TPO and HEMA: the two ingredients worth reading the label for
Beyond the lamp, two chemicals decide whether a cat eye gel is a fit for your skin and your region. TPO is a photo-initiator that helps some UV gels cure, and it has been banned in cosmetics across the European Union since 1 September 2025, classified as CMR category 1B, meaning toxic for reproduction, with no transitional period allowed. That is a hard cutoff, not a phase-out.
HEMA is a different molecule, an acrylate that acts as a known sensitizer and allergen. Repeated skin contact can trigger reactions, which is why brands increasingly advertise “HEMA-free” formulas for reactive skin. Reading these two names on a label tells you most of what you need. A sensitization to HEMA typically develops after repeated exposure rather than on first contact, so someone who has used the same gel brand for years without issue can still develop a reaction over time; switching to a HEMA-free formula at the first sign of redness or itching around the cuticle is the standard recommendation.
What each concern means in practice:
- TPO: EU-market gels reformulated to remove it as of the 2025 ban; check the source if you buy imported product.
- HEMA: a sensitizer, so choose HEMA-free if you have reactive or allergy-prone skin or you get sidewall irritation.
- Region: the United Kingdom is expected to follow the EU on TPO, with a targeted deadline of late 2026.
The European Commission publishes a plain-language explainer on the TPO ban and what it means for nail products. If you are outside the EU, the ingredient may still appear in gels sold locally, so the label remains your only reliable check. The Irish health products regulator, HPRA, has also issued its own notice confirming TPO’s addition to the EU’s list of prohibited cosmetic ingredients, which is a useful second source if you want to verify the timeline independently rather than relying on a single body.
Fixing a failed effect: blur, dead particles, smudge and the vanishing band
When a cat eye comes out wrong, the cause is almost always one of four things, and each has a specific fix. A blurry, low-contrast band usually means your coat was too thick or your base was too pale; a black base sharpens the line and a thinner coat lets the particles cluster tightly. “Dead” particles that no longer respond happen when the gel started to skin over before you brought the magnet in; re-apply a fresh thin coat and work faster this time.
A smudge across the surface means the magnet touched the wet gel, so hover, never rest it. And a band that disappears after curing usually means you did not cure immediately, letting the aligned pattern relax back to random.
Quick diagnosis table:
| Symptom | Likely cause | Fix |
|---|---|---|
| Blurry, weak line | Coat too thick or base too light | Thin coat over a black base |
| Particles won’t move | Gel began to set | Re-apply a fresh thin coat |
| Surface smudge | Magnet touched the gel | Hover only, never contact |
| Band vanished | Cured too late | Flash cure the instant it looks right |
The through-line is speed and thinness. A thin coat over a dark base, a magnet that hovers, and a lamp fired the second the band snaps into focus will solve the large majority of failures.
A less common but frustrating problem is uneven particle distribution straight out of the bottle, where the iron powder has settled to the bottom during storage. Before every use, roll the bottle between your palms rather than shaking it violently, since aggressive shaking can introduce air bubbles into the gel that show up as small craters once cured. A gentle roll redistributes the powder evenly without adding air, and it is worth doing even if the gel looks fine, because settled powder at the bottom of the bottle will give you a weak, patchy first coat.
Safe removal by acetone soak-off, never by peeling
How you take cat eye gel off matters as much as how you put it on, because peeling or scraping lifts layers of the natural nail with the gel and is a leading cause of thin, damaged plates. The correct method is an acetone soak-off: buff the shiny top coat to break the seal, saturate a cotton pad with acetone, press it to the nail, wrap in foil, and wait until the gel softens enough to slide off with gentle pressure.
If it resists, it needs more soak time, not more force. Never bite, pick or pry the product off. Soak times vary depending on how thick or old the gel is; check every few minutes rather than assuming a fixed time will always be enough.
General nail-health guidance from dermatology bodies supports this. The American Academy of Dermatology publishes basic healthy nail tips that emphasize not pulling or picking at nail products. The Mayo Clinic’s guidance on nail care do’s and don’ts similarly warns against forcing off gel or acrylic products, since the mechanical damage from peeling tends to outlast the manicure itself in the form of thin, ridged nail plates.
Give your nails a breather between sets, keep cuticles moisturized, and if a gel is stubborn, extend the soak rather than escalating the mechanical force. After removal, a light buff to smooth any remaining residue followed by cuticle oil helps the nail recover before the next application.
Cat eye gel versus press-on and sticker alternatives
If the lamp, the magnet and the removal routine sound like a lot, there are lower-commitment paths to a similar look, each with trade-offs in wear, cost and skill. Gel cat eye gives the truest moving shimmer and gel-length wear, but it requires a lamp, technique and an acetone removal.
Press-on cat eye nails skip the lamp entirely and apply in minutes, though they wear for a shorter window and the “movement” is baked into a fixed print rather than live particle alignment. Sticker or wrap versions are the cheapest and fastest, but they read as printed foil up close and rarely fool anyone in bright light.
Choosing between them:
- Gel: best realism and longevity, needs a lamp and soak-off removal.
- Press-on: fast, no lamp, shorter wear, fixed pattern.
- Stickers/wraps: cheapest and quickest, least convincing shimmer.
For a true cat eye that shifts as you move your hand, gel is the only option that reproduces the physics, because only a wet, magnetizable coat can align live iron powder. That said, press-ons are a reasonable choice for a single event where you do not want to invest in a lamp or magnet set, and stickers work well as a quick test of whether you like the general aesthetic before committing to the full gel process.
What you need before you start: a basic tool checklist
A first-time cat eye set does not require a professional cart, but a short list of tools makes the process far smoother than working with the bare minimum. At minimum you need a base coat, at least one cat eye gel color, a magnet suited to that gel, a top coat, and a UV or LED curing lamp, since air-drying will not work on any of these layers.
- Base coat compatible with your gel system.
- One or more cat eye magnetic gel polishes.
- A magnet, ideally a flat bar to start, with a pointed or multi-head magnet added later for more designs.
- An opaque dark polish or gel for the contrast base, if you want the sharpest band.
- Top coat, cured and often wiped to remove a tacky residue layer.
- A UV or LED lamp sized for your hand, plus a timer if your lamp does not have one built in.
- Lint-free wipes and isopropyl alcohol or a dehydrator for prep.
- Acetone, foil, and cotton pads for eventual removal.
Buying a magnet and gel from the same brand is the simplest way to avoid guesswork on distance and timing, since the numbers in the earlier reference table are brand-specific. Once you understand how your first pairing behaves, mixing gels and magnets across brands becomes much easier to judge by eye.
Frequently asked questions
How long does cat eye nail polish last?
Cat eye gel wears like any standard gel manicure when applied properly, meaning it holds up for weeks rather than days. The decisive factor is capping the free edge on every layer, which seals the tip against chipping and peeling. Skip that step and lift starts early. Proper prep, thin cured layers and a soak-off removal all extend the wear you get.
Do I really need a UV or LED lamp?
Yes. Cat eye polish is a gel, not classic lacquer, so it will not harden in open air and must be cured under a lamp. Bio Seaweed Gel, for example, lists a shorter cure time under LED than under UV for its base. Without a lamp the coat stays tacky, the shimmer band relaxes, and the manicure never sets at all.
Is cat eye nail polish safe to use?
The gel itself is generally low concern, but the curing lamp draws scrutiny. The FDA rates nail lamps low risk when used per label and caps exposure at 10 minutes per hand. The AAD advises SPF 30 or higher on the hands, since a UC San Diego study found cell death and DNA damage from repeated UV dryer sessions. Protect your skin and follow cure times.
Why did my cat eye band disappear after curing?
The band vanished because the gel was not cured immediately after aligning the particles. Iron powder only holds its pattern for a short window while the coat is fluid; if you wait, the flecks drift back toward random and the light line dissolves. Fire your lamp the instant the band snaps into sharp focus under the magnet.
What is the difference between cat eye, magnetic and velvet or galaxy nails?
They are largely the same category of magnetic gel described with different marketing names. “Cat eye” stresses the single slit-of-light band, while “velvet,” “aurora” and “galaxy” describe softer, wider or swirled magnet effects on the same iron-powder gels. The gel chemistry is identical; only the magnet shape and motion change the resulting pattern.
Can I put nail art on top of a cat eye layer?
Yes, and overlay is one of the most rewarding techniques. Cure your first cat eye coat fully, then apply a sheer tinted gel and pull a second offset band, or add stamping and decals over the cured surface. The stacked light lines add depth, and a sheer color shifts the shimmer’s tone without a new bottle. Cure and seal with top coat as usual.
Why does my gel look different from the bottle color once cured?
This usually comes down to base color and coat thickness rather than a faulty product. A thin coat over black shows a bright, narrow band with dark surroundings, while the same gel over a pale base or in a thicker layer looks softer and less saturated. If a color looks washed out compared to photos you have seen, try a darker base coat or a thinner application before assuming the gel itself is the problem.